

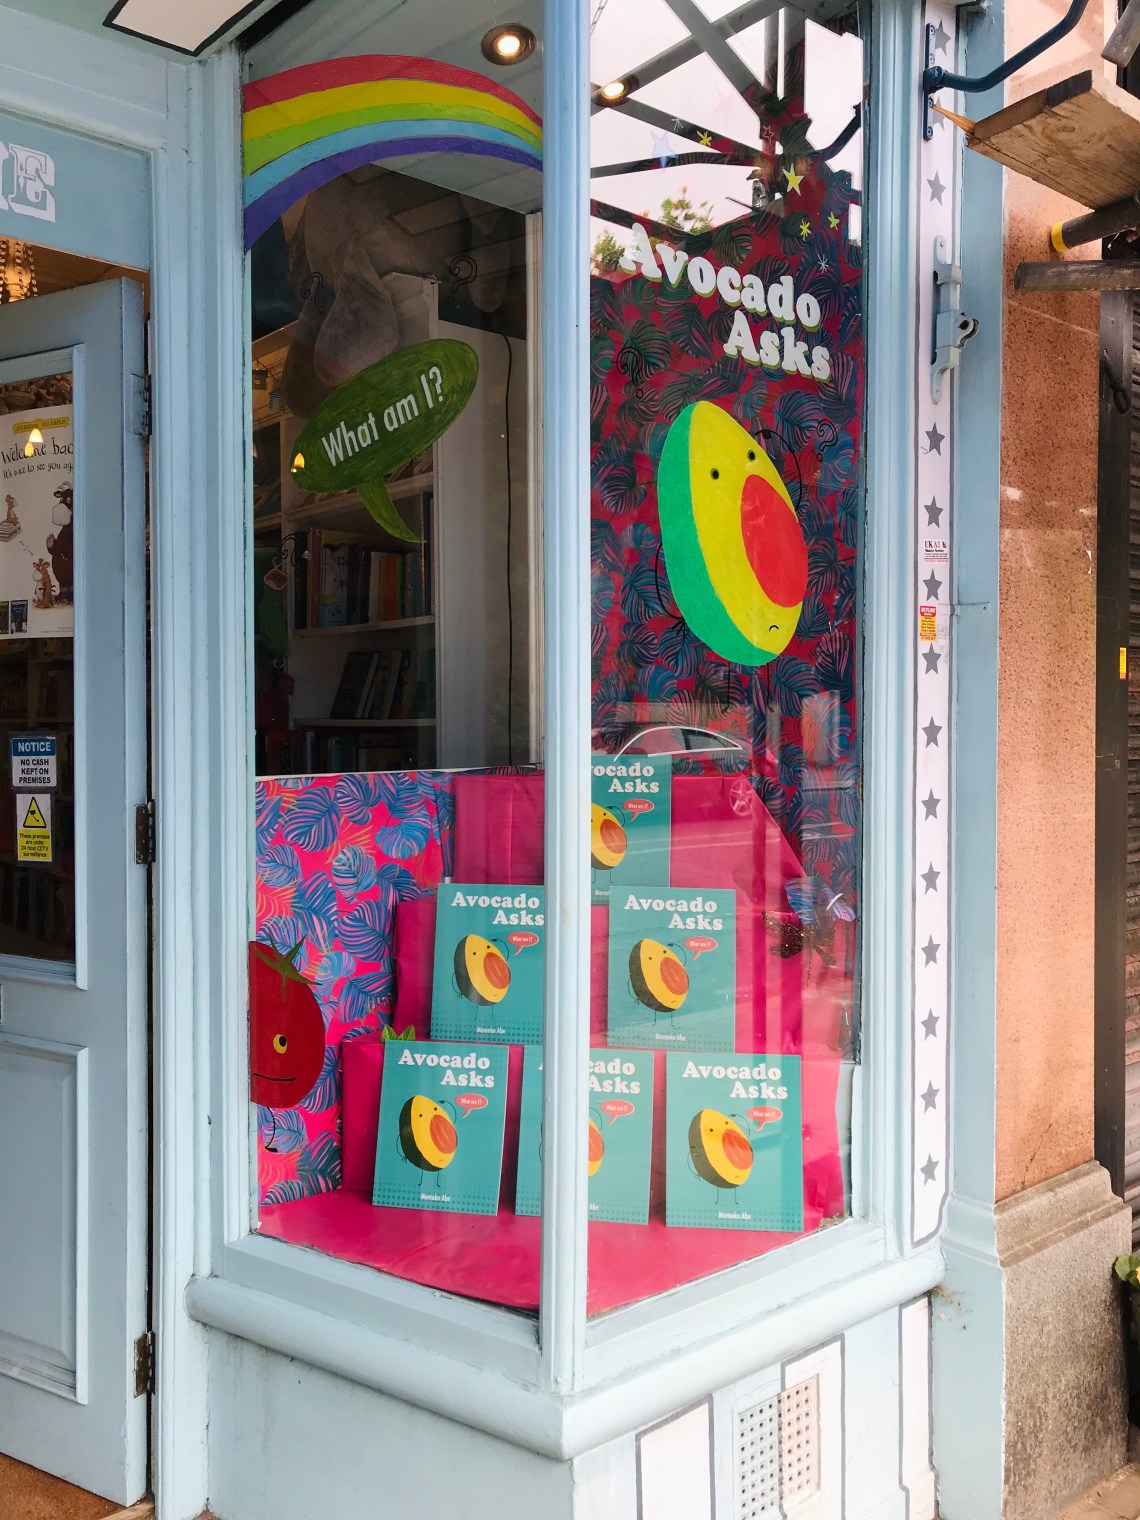
My debut picture book, Avocado Asks (Orchard), came out in paperback on the 23rd of July. To promote it, I did a window painting for the first time in my life. The venue who kindly offered me the opportunity was Tales on Moon Lane in London. Since it was my first time, I was clueless, so I asked my fellow illustrators for advice. Their advice made a big difference. I thought I’d write a post about my first window painting experience so I can pass on the advice 😉
When I researched how to paint windows, there were roughly two schools – painting on the outside of windows vs painting on the inside of windows. The benefit of painting on the outside of windows is that you can avoid glares/reflections to obstruct your painting. On the other hand, the advantage of painting on the inside is that you don’t have to worry about wet weather. In London, the latter seemed a sensible choice.
When you paint the window from the inside, you need to paint the picture in reverse. This makes things a bit tricky. But Zehra Hicks (Pug Hug, The Problem with Problems) gave me a life saving tip – make a guide. Here are the steps I took:
STEP 1
Ask the bookshop for the window dimensions.
STEP 2
Plan the design, using the window dimensions (I used Photoshop). Flip the entire design so it becomes reversed. Print it out in actual size (I printed out over multiple A4 papers and stitched together).
STEP 3
Stick the guide onto the window from the outside. I used masking tape first but it kept peeling off so I ended up using normal sellotape.


STEP 4
PAINT! People’s favourite mediums seem to be Posca and acrylic. Like Qian Shi, who did cute window painting at House of Illustration for her book, The Weaver, I found Posca is much easier to use. Acrylic was too translucent so I needed a second coating. Having said that, white Posca turned out almost completely transparent so I had to use white acrylic. So I used Posca for lines and small sections and acrylic & brushes for bigger sections.
VERY IMPORTANT: Because you paint back to front, you need to paint backwards (paint what should be on front/top first). To remind myself, I wrote down colours and their orders on the guide.
What I learned by trial and error on the day was that Posca and acrylic don’t layer well. When I painted acrylic over Posca, it dissolved Posca! So I had to paint around it.


STEP 5
Peel off the guide paper and Ta-Dah! 4 hours and a half later, my Avocado window was complete!


FINAL NOTES
- Preparation. Preparation. Preparation. Plan your painting as much as possible in advance as actual painting itself would take much longer than you would expect. So planning in advance will save your time on the day.
- Test. Test. Test. Test your painting material on e.g. a glass jar to see if they work on glass and what you can do and can’t do with them before the actual painting day.
The whole thing took much longer than I had expected but I was glad it turned out as I hoped, thanks to all the advice my friends gave me. Hope you found this post helpful. The Avocado Asks window display should be there another week or so. If you are in the area, come and check it out! Thank you, Tales on Moon Lane, for having me!

ABOUT TALES ON MOON LANE
Tales on Moon Lane is a dedicated children’s bookshop in Herne Hill, London. The store is something of an institution in the UK children’s book world. They run regular in/out-store events such as story time. It’s a real gem for those who love children’s books.

1 Comment